How to Configure an IPv6-Only Peering Session
Introduction
The following article presents the steps that must be followed to configure a BGP peering session between two IPv6-only routers.
In BGP parlance [1]: “Two routers that have established connection for exchanging BGP information are referred to as BGP peers. Such BGP peers exchange routing information between them via BGP sessions...”
- Two routers
- Connectivity between the routers
- IPv6 support in both devices (connectivity and BGP)
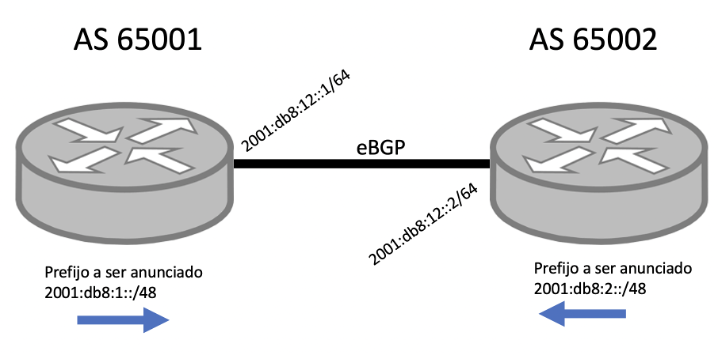
For Router R1:
- R1 IPv6 address: 2001:db8:12::1/64
- R1 router ID: 10.111.111.1
- v6 prefix to be announced by R1: 2001:db8:1::/48
- IPv6 /128 for loopback: 2001:db8:1:11::cafe/128
For Router R2:
- R2 IPv6 address: 2001:db8:12::2/64
- R2 router-ID: 10.222.222.2
- v6 prefix to be announced by R2: 2001:db8:2::/48
- IPv6 /128 for loopback: 2001:db8:2:11::cafe/128
Step 1: IPv6 connectivity between the routers
To establish and test the connectivity between the routers we must:
- Establish the physical connection:
- Make sure that the physical connection between the assigned interfaces of both routers has been established.
- Check that this link is UP.
- Configure IPv6 on the related interfaces:
- Assign the WAN IPv6 addressing to be used on the link. All addresses used in this document are part of the 2001:db8::/32 prefix reserved for documentation purposes.
- Configure IPv6 in the related interfaces.
- Test IPv6 connectivity:
- Perform an IPv6 ping from one of the two devices.
- If the destination cannot be reached, this issue must be fixed before proceeding.
- The destination may be filtering the IPv6 ping packets (ICMPv6 Echo Request/Reply), but that does not mean that BGP will not work. Check from the other device.
Note: By default, BGP thinks that its neighbor is directly connected, in other words, that the neighbor is the next device on the network. If this is not the case, further configuration may be required, such as eBGP Multihop [2]. This topic, however, will not be addressed in this article.
Cisco (IOS-15.4)
R1
Interface status:
R1#sh int et0/0
Ethernet0/0 is up, line protocol is up
  Hardware is AmdP2, address is aabb.cc00.0100 (bia aabb.cc00.0100)
Interface configuration:
interface Ethernet0/0
 description ## R1 to R2 ##
 no ip address
 ipv6 address 2001:DB8:12::1/64
 ipv6 nd ra suppress			#recomendado, no envía mensajes de RA
R2
Interface status:
R2#sh int et0/0
Ethernet0/0 is up, line protocol is up
  Hardware is AmdP2, address is aabb.cc00.0200 (bia aabb.cc00.0200)
Interface configuration:
interface Ethernet0/0
 description ## R2 to R1 ##
 no ip address
 ipv6 address 2001:DB8:12::2/64
 ipv6 nd ra suppress
Connectivity test:
R2#ping ipv6 2001:DB8:12::1
Type escape sequence to abort.
Sending 5, 100-byte ICMP Echos to 2001:DB8:12::1, timeout is 2 seconds:
!!!!!
Success rate is 100 percent (5/5), round-trip min/avg/max = 1/4/6 ms
R2#
R2#sh ipv6 neighbors
IPv6 Address                              Age Link-layer Addr State Interface
2001:DB8:12::1                              0 aabb.cc00.0100  REACH Et0/0
FE80::A8BB:CCFF:FE00:100                   12 aabb.cc00.0100  STALE Et0/0
Should we create the BGP session between Link Local Addresses (LLA) or Global Unicast Addresses (GUA)?
Sometimes we will have to decide how to create the BGP session. Three options are available:
- Use Link Local Addresses (LLA),
- Use Global Unicast Addresses (GUA), or
- Use Unique Local Addresses (ULA).
The first two are the most common.
So, which option should you use to create the BGP session?
We will answer the question, but first we want to provide you with the explanation.
Let’s review some basic concepts:
- Remember that BGP messages contain attributes, one of which the Next-Hop attribute [3]. The information contained in this attribute is very simple: the next-hop IP address that is to be used to reach a destination.
- When a router (an eBGP speaker) learns a prefix from another AS, it copies the next-hop attribute to its iBGP network.
- An iBGP speaker network will traditionally have an IGP.
- Link-local addresses are local in scope and are limited to the network bus itself, the LAN, the SSID, etc. They cannot be routed.
Perhaps by now you have already found the answer to the question of which option you should use :-)
Our recommendation is to establish the BGP session on GUA and, now that we have reviewed the premises, it is easy to answer with a question: How will an eBGP speaker copy a link-local address in the next-hop to its iBGP speakers? The answer is simple: it can't (sure, some workarounds exist, but we will not go there).
Step 2: Define the router-ID on the different routers
Because we are talking about IPv6-only devices, we assume that they will not have IPv4 addressing. But what does this have to do?
Here’s a brief explanation:
- Why a router-id? The router-id is a 32-bit field that travels in the BGP OPEN message. Known as a BGP Identifier, this field ??is mandatory and is represented in IPv4 address format.
- Routers have a mechanism they use to obtain their router-id.
- If the router is IPv6-only, the device will not be able to determine its router-id.
- If the router cannot determine its router-id, the administrator must explicitly configure one within the BGP process.
Step 3: Configure the routers
We will show two examples: Mikrotik and Cisco. The information is exactly the same, the difference is how they are configured and the operating system commands. In the case of Mikrotik, we will use version 6.x.Mikrotik (RouterOS v6)
Router R1
Loopback interface configuration
/interface bridge add name=loopback protocol-mode=none disabled=no
/ipv6 address add address=2001:db8:1:11::cafe/128 advertise=no interface=loopback
BGP process/instance configuration
/routing bgp instance add name=AS65001 as=65001 router-id=10.111.111.1Peer configuration
/routing bgp peer add name=HACIAR2 instance=AS65001 remote-address=2001:db8:12:2 remote-as=65002 address-families=ipv6Prefix announcement
routing bgp network add network=2001:db8:1::/48 synchronize=noRouter R2
Loopback interface configuration
/interface bridge add name=loopback protocol-mode=none disabled=no
/ipv6 address add address=2001:db8:2:11::cafe/128 advertise=no interface=loopback
BGP process/instance configuration
/routing bgp instance add name=AS65002 as=65002 router-id=10.222.222.2Peer configuration
/routing bgp peer add name=HACIAR1 instance=AS65002 remote-address=2001:db8:12:1 remote-as=65001 address-families=ipv6Prefix announcement
routing bgp network add network=2001:db8:2::/48 synchronize=noCheck the BGP session / Troubleshooting
From R2
It is important for the letter "E" to appear in the output, as it means that the BGP session has been properly established.

Cisco (IOS-15.4)
Enable IPv6
Before starting with the BGP configuration, some IOS versions first require enabling:
- ipv6 unicast-routing: Enables IPv6 packet routing.
- ipv6 cef: Enables Cisco Express Forwarding for IPv6 packets. This means that packet processing will be performed using hardware, otherwise it would be performed by software and have a direct impact on the device's CPU.
R1#configure terminal		#entramos en modo configuración
R1(config)#
R1(config)#ipv6 unicast-routing
R1(config)#ipv6 cef
R1
Enter Configuration Mode:
R1#configure terminal
R1(config)#
Configure the loopback0 interface:
R1(config)#interface loopback 0 #configuración de la interfaz loopback
R1(config-if)#ipv6 address 2001:db8:1::1/128 #dirección ipv6 de la interfaz loopback
R1(config-if)#exit
R1(config)#
Configure BGP:
R1(config)# router bgp 65001		#creamos el proceso de BGP con el ASN
R1(config-router)# bgp router-id 10.111.111.1	#definimos el router-id
R1(config-router)# no bgp default ipv4-unicast	#desactivar la configuración default de un neighbor en el AF IPv4
R1(config-router)#neighbor 2001:DB8:12::2 remote-as 65002	#definimos el neighbor
R1(config-router)# address-family ipv6	#entramos en el AF de IPv6
R1(config-router-af)#  neighbor 2001:DB8:12::2 activate	#activamos el neighbor en este AF
R1(config-router-af)#  network 2001:DB8:1::/48	#prefijo a ser anunciado
R1(config-router-af)#exit
R1(config-router)#exit
R1(config)#ipv6 route 2001:db8:1::/48 Null0 #Cisco necesita que el prefijo a ser anunciado se encuentre en la tabla de enrutamiento

R1(config)#exit
R1#
R2
Enter Configuration Mode:
R2#configure terminal
R2(config)#
Configure the loopback0 interface:
R2(config)#interface loopback 0
R2(config-if)#ipv6 address 2001:db8:2::1/128
R2(config-if)#exit
R2(config)#
Configure BGP:
R2(config)#router bgp 65002
R2(config-router)# bgp router-id 10.222.222.2
R2(config-router)# no bgp default ipv4-unicast
R2(config-router)# neighbor 2001:DB8:12::1 remote-as 65001
R2(config-router)# address-family ipv6
R2(config-router-af)#  neighbor 2001:DB8:12::1 activate
R2(config-router-af)#  network 2001:DB8:2::/48
R2(config-router-af)#exit-address-family
R2(config-router)#exit
R2(config)#ipv6 route 2001:db8:2::/48 Null0 #Cisco necesita que el prefijo a ser anunciado se encuentre en la tabla de enrutamiento

R2(config)#exit
R2#
Check the BGP session / Troubleshooting
show bgp ipv6 unicast summary
This command will show a list of existing peers. To check whether the BGP session is up, we can look at the “State/PfxRcd” column and make sure that it contains a number. This number specifies the number of prefixes received. In our case, we expect to receive 1 prefix (the IPv6 address of the neighbor's loopback interface):
R1#show bgp ipv6 unicast summary
BGP router identifier 10.111.111.1, local AS number 65001
BGP table version is 3, main routing table version 3
2 network entries using 328 bytes of memory
2 path entries using 208 bytes of memory
2/2 BGP path/bestpath attribute entries using 288 bytes of memory
1 BGP AS-PATH entries using 24 bytes of memory
0 BGP route-map cache entries using 0 bytes of memory
0 BGP filter-list cache entries using 0 bytes of memory
BGP using 848 total bytes of memory
BGP activity 2/0 prefixes, 2/0 paths, scan interval 60 secs

Neighbor        V           AS MsgRcvd MsgSent   TblVer  InQ OutQ Up/Down  State/PfxRcd
2001:DB8:12::2  4        65002      14      13        3    0    0 00:08:39        1
R1#
show bgp ipv6 unicast
This command shows the device's IPv6 BGP table and allows a detailed identification of learned prefixes.
R1#show bgp ipv6 unicast
BGP table version is 3, local router ID is 10.111.111.1
Status codes: s suppressed, d damped, h history, * valid, > best, i - internal,
              r RIB-failure, S Stale, m multipath, b backup-path, f RT-Filter,
              x best-external, a additional-path, c RIB-compressed,
Origin codes: i - IGP, e - EGP, ? - incomplete
RPKI validation codes: V valid, I invalid, N Not found

     Network          Next Hop            Metric LocPrf Weight Path
 *>  2001:DB8:1::/48  ::                       0         32768 i		#prefijo IPv648 local
 *>  2001:DB8:1::/48  2001:DB8:12::2           0         0 65002 i	#prefijo IPv6 remoto
R1#
Once we are sure that both routers have learned the neighbor's prefix, we can check the IPv6 connectivity between the IP addresses of the loopback interfaces at both ends:
Ping from R1:R1#ping ipv6 2001:db8:2::1
Type escape sequence to abort.
Sending 5, 100-byte ICMP Echos to 2001:DB8:2::1, timeout is 2 seconds:
!!!!!
Success rate is 100 percent (5/5), round-trip min/avg/max = 1/4/5 ms
R1#
PING6 connectivity Check from R1 to R2, at the IPv6 loopback level
An interesting aspect of Mikrotik is that the same command is used to perform PING (IPv4) and PING6 (IPv6) tests; Mikrotik identifies the destination IP address and proceeds to perform the PING or PING6 tests based on the corresponding protocol. This is not the case in other routers where, to explain that the PING is an IPv6 PING, different commands such as 'ping6' (Cisco Nexus) or 'ping ipv6' must be used.
[admin@R1] > /ping 2001:db8:2:11::cafe src-address=2001:db8:1:11::cafe count=4
  SEQ HOST                                     SIZE TTL TIME  STATUS
    0 2001:db8:2:11::cafe                       56 123 0ms   echo reply
    1 2001:db8:2:11::cafe                       56 123 0ms   echo reply
    2 2001:db8:2:11::cafe                       56 123 0ms   echo reply
    3 2001:db8:2:11::cafe                       56 123 0ms   echo reply
    sent=4 received=4 packet-loss=0% min-rtt=0ms avg-rtt=0ms max-rtt=0ms
In this section we will show a basic example of how to configure outbound and inbound filters in BGP.
The following filters are configured so that only the addresses of the loopback0 interfaces of both routers are propagated:
- R1’s outbound filter, configured to allow only its loopback0 address to be advertised to R2
- R2’s inbound filter, configured to allow only R1's loopback0 address
- R2’s outbound filter, configured to allow only its loopback0 address to be advertised to R1
- R1’s inbound filter, configured to allow only R2's loopback0 address
What you need to know before the configuration:
- Prefix-list:
- Prefix Lists are used to define the prefixes that will be used by the filter.
- In our case, we will use the following:
- PREFIXES-AS6500X: To identify ASN prefixes.
- ALL-v6: All IPv6 prefixes. To be included at the end and filter all the rest.
- Route-map:
- A route-map is a sequence of permit or deny commands.
- In this case, it is used to permit or deny the announcement of prefixes via BGP.
Example for Mikrotik
There are several ways to program the filters to be used for eBGP sessions in Mikrotik routers. These range from very simple and basic, through detailed and somewhat complex, to the most advanced methods, which include filtering based on the handling and configuration of advanced attributes such as MED, NEXT_HOP, AS_PATH, LOCAL_PREF, among many others. In this case, in order to illustrate the concept first-hand, we will use a basic and simple BGP filtering configuration, and we will only use the PREFIX and PREFIX_LEN parameters to define the filters.
As in any BGP session filtering configuration, we must configure an inbound BGP filter (IN) and an outbound BGP filter (OUT) in each BGP peer. This means that we must configure an IN filter and an OUT filter for R1, and we must define an IN filter and an OUT filter for R2. That said, we will define the following configuration parameters for each router in the eBGP session:
Router R1:
- Name of the IN filter: ebgp-r2-ipv6-IN
- Name of the OUT filter: ebgp-r2-ipv6-OUT
- IPv6 prefix to be announced: 2001:db8:1::/48
Router R2:
- Name of the IN filter: ebgp-r1-ipv6-IN
- Name of the OUT filter: ebgp-r1-ipv6-OUT
- IPv6 prefix to be announced: 2001:db8:2::/48
Mikrotik filters are configured in the ‘/routing filter’ configuration section. The configuration for Mikrotik RouterOS v6 would be as follows:
For Router R1:
[admin@RouterOS-v6-R1] > /routing filter
[admin@RouterOS-v6-R1] /routing filter > add chain=ebgp-r2-ipv6-IN
prefix=2001:db8:2::/48 prefix-length=48-48 action=accept
[admin@RouterOS-v6-R1] /routing filter > add chain= ebgp-r2-ipv6-IN
prefix=::/0 prefix-length=0-128 action=discard
[admin@RouterOS-v6-R1] /routing filter > print where
Chain=ebgp-r2-ipv6-IN
Flags: X - disabled
 0   chain=ebgp-r2-ipv6-IN prefix=2001:db8:2::/48 prefix-length=48 invert-match=no action=accept set-bgp-prepend-path=""
 1   chain=ebgp-r2-ipv6-IN prefix=::/0 prefix-length=0-128 invert-match=no action=discard set-bgp-prepend-path=""
 [admin@RouterOS-v6-R1] > /routing filter
[admin@RouterOS-v6-R1] /routing filter > add chain=ebgp-r2-ipv6-OUT prefix=2001:db8:1::/48 prefix-length=48-48 action=accept
[admin@RouterOS-v6-R1] /routing filter > add chain=ebgp-r2-ipv6-OUT prefix=::/0 prefix-length=0-128 action=discard
[admin@RouterOS-v6-R1] /routing filter > print where chain=ebgp-r2-ipv6-OUT
Flags: X - disabled
 0   chain=ebgp-r2-ipv6-OUT prefix=2001:db8:1::/48 prefix-length=48 invert-match=no action=accept set-bgp-prepend-path=""
 1   chain=ebgp-r2-ipv6-OUT prefix=::/0 prefix-length=0-128 invert-match=no action=discard set-bgp-prepend-path=""
For Router R2:
[admin@RouterOS-v6-R2] > /routing filter
[admin@RouterOS-v6-R2] /routing filter > add chain=ebgp-r1-ipv6-IN
prefix=2001:db8:1::/48 prefix-length=48-48 action=accept
[admin@RouterOS-v6-R2] /routing filter > add chain= ebgp-r1-ipv6-IN
prefix=::/0 prefix-length=0-128 action=discard
[admin@RouterOS-v6-R2] /routing filter > print where Chain=ebgp-r1-ipv6-IN
Flags: X - disabled
 0   chain=ebgp-r1-ipv6-IN prefix=2001:db8:1::/48 prefix-length=48 invert-match=no action=accept set-bgp-prepend-path=""
 1   chain=ebgp-r1-ipv6-IN prefix=::/0 prefix-length=0-128 invert-match=no action=discard set-bgp-prepend-path=""
 [admin@RouterOS-v6-R2] > /routing filter
[admin@RouterOS-v6-R2] /routing filter > add chain=ebgp-r1-ipv6-OUT prefix=2001:db8:1::/48 prefix-length=48-48 action=accept
[admin@RouterOS-v6-R2] /routing filter > add chain=ebgp-r1-ipv6-OUT prefix=::/0 prefix-length=0-128 action=discard
[admin@RouterOS-v6-R2] /routing filter > print where chain=ebgp-r1-ipv6-OUT
Flags: X - disabled
 0   chain=ebgp-r1-ipv6-OUT prefix=2001:db8:2::/48 prefix-length=48 invert-match=no action=accept set-bgp-prepend-path=""
 1   chain=ebgp-r1-ipv6-OUT prefix=::/0 prefix-length=0-128 invert-match=no action=discard set-bgp-prepend-path=""
After creating the IN and OUT filters for both R1 and R2, we must assign those filters to the corresponding eBGP sessions. The commands for this configuration are included below:
For Router R1:
[admin@RouterOS-v6-R1] > /routing bgp peer
[admin@RouterOS-v6-R1] /routing bgp peer> set [find name=HACIAR2]
in-filter=ebgp-r2-ipv6-IN
[admin@RouterOS-v6-R1] /routing bgp peer> set [find name=HACIAR2]
out-filter=ebgp-r2-ipv6-OUT
[admin@RouterOS-v6-R1] /routing bgp peer> print detail
[admin@RouterOS-v6-R2] > /routing bgp peer
[admin@RouterOS-v6-R2] /routing bgp peer> set [find name=HACIAR1]
in-filter=ebgp-r1-ipv6-IN
[admin@RouterOS-v6-R2] /routing bgp peer> set [find name=HACIAR1]
out-filter=ebgp-r1-ipv6-OUT
[admin@RouterOS-v6-R2] /routing bgp peer> print detail
Important: Configuring the IPv6 prefix to be announced is very important. The most common way to configure this IPv6 prefix is in the ‘/routing bgp network’ section with the 'synchronize=no' attribute. In this case, Mikrotik (version 6) will announce the IPv6 prefix in an 'unconditional' manner (but be careful: it will be filtered by the corresponding OUT filters). Alternatively, we can include the IPv6 prefix in Mikrotik's BGP networks by setting the ‘synchronize=yes’ attribute, but in this case the prefix will only be announced if it is active in Mikrotik's IPv6 route table. Finally, we can also use ‘redistribute’ techniques to announce IPv6 prefixes. It should also be noted that we can announce via eBGP any prefix with a length between /32 and /48 (both inclusive) that is part of the prefix we have been assigned by LACNIC.
Example for Cisco
R1:
ipv6 prefix-list ALL-v6 seq 5 permit ::/0 le 128
!
ipv6 prefix-list PREFIXES-AS65001 seq 5 permit 2001:DB8:1::/48
!
ipv6 prefix-list PREFIXES-AS65002 seq 5 permit 2001:DB8:2::/48
!
route-map RM-R1-R2-IN permit 10	#permite recibir los prefijos del AS65002
 match ipv6 address prefix-list PREFIXES-AS65002
!
route-map RM-R1-R2-IN deny 20		#no permite recibir ningún otro prefijo
 match ipv6 address prefix-list ALL-v6
!
route-map RM-R1-R2-OUT permit 10	#permite anunciar los prefijos del AS65001
 match ipv6 address prefix-list PREFIXES-AS65001
!
route-map RM-R1-R2-OUT deny 20	#no permite anunciar ningún otro prefijo
 match ipv6 address prefix-list ALL-v6
!
router bgp 65001
 address-family ipv6
  neighbor 2001:DB8:12::2 route-map RM-R1-R2-IN in	#asocia el route-map al neighbor
  neighbor 2001:DB8:12::2 route-map RM-R1-R2-OUT out #asocia el route-map al neighbor
 exit-address-family
!
R2:
ipv6 prefix-list ALL-v6 seq 5 permit ::/0 le 128
!
ipv6 prefix-list PREFIXES-AS65001 seq 5 permit 2001:DB8:1::/48
!
ipv6 prefix-list PREFIXES-AS65002 seq 5 permit 2001:DB8:2::/48
!
route-map RM-R2-R1-IN permit 10
 match ipv6 address prefix-list PREFIXES-AS65001
!
route-map RM-R2-R1-IN deny 20
!
route-map RM-R2-R1-OUT permit 10
 match ipv6 address prefix-list PREFIXES-AS65002
!
route-map RM-R2-R1-OUT deny 20
 match ipv6 address prefix-list ALL-v6
!
router bgp 65002
 address-family ipv6
  neighbor 2001:DB8:12::1 route-map RM-R2-R1-IN in
  neighbor 2001:DB8:12::1 route-map RM-R2-R1-OUT out
 exit-address-family
!
Verification
R1:
R1#show bgp ipv6 unicast
BGP table version is 9, local router ID is 10.111.111.1
Status codes: s suppressed, d damped, h history, * valid, > best, i - internal,
              r RIB-failure, S Stale, m multipath, b backup-path, f RT-Filter,
              x best-external, a additional-path, c RIB-compressed,
Origin codes: i - IGP, e - EGP, ? - incomplete
RPKI validation codes: V valid, I invalid, N Not found

     Network          Next Hop            Metric LocPrf Weight Path
 *>  2001:DB8:1::/48  ::                       0         32768 i
 *>  2001:DB8:2::/48  2001:DB8:12::2           0             0 65002 i
R1#
R2:
R2#show bgp ipv6 unicast
BGP table version is 9, local router ID is 10.222.222.2
Status codes: s suppressed, d damped, h history, * valid, > best, i - internal,
              r RIB-failure, S Stale, m multipath, b backup-path, f RT-Filter,
              x best-external, a additional-path, c RIB-compressed,
Origin codes: i - IGP, e - EGP, ? - incomplete
RPKI validation codes: V valid, I invalid, N Not found

     Network          Next Hop            Metric LocPrf Weight Path
 *>  2001:DB8:1::/48  2001:DB8:12::1           0             0 65001 i
 *>  2001:DB8:2::/48  ::                       0         32768 i
R2#
While many errors may occur in a BGP session, we will share two very typical cases:
The BGP session cannot be established. There can be many reasons why a BGP session between two peers cannot be established. The most likely include:
- There is no IP connectivity between them
- There is a discrepancy in the information between the peers (e.g., wrong IP address, autonomous system)
My prefix is not being announced. Again, there may be many reasons why a prefix is ??not being announced. The three most common are:
- An outbound filter has been configured in the BGP session that denies the announcement of the prefix
- The prefix you wish to advertise is not present in the routing table
- Modern BGP implementations require policy implementations on the BGP session before prefix announcements can be made
Setting up a BGP session (i.e., creating a BGP peering) is very easy, you just need to know the right parameters and how to include them in the configuration depending on the device.
BGP gets complicated when there are several peers involved, when there is a need for inbound and/or outbound filters in BGP sessions, and especially when an autonomous system transits traffic and prefixes from other ASs. The general recommendation is to study hard and be overly cautious with any configuration.
It is always important to keep an eye on BGP security, announcements, filters, and operation. We suggest reading the following BCP (Operations and Security): https://datatracker.ietf.org/doc/html/rfc7454
Likewise, LACNIC has many videos on BGP: https://www.youtube.com/c/lacnicstaff/search?query=bgp
And our CAMPUS also offers a course that covers much of this topic: https://campus.lacnic.net/mod/page/view.php?id=10647
Choose each router's router-ID “wisely”.